Tuesday, February 25, 2014

POT PEOPLE and PETS

clip_image002


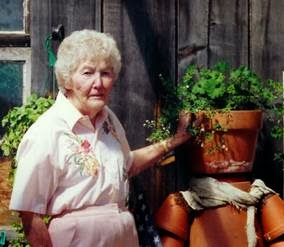
Winter is a great time to work on accessories for your garden, especially ones that can also make great use of old pots.  These pot people and pets can be made in any size – even life size – just by altering the size pots used. 


(“Herbie Potsky” was named by a customer and sat outside the barn gift shop at my nursery business in PA)


Have fun and be creative!


POT PEOPLE 

MATERIALS:           

Clay pots:      2 - 4” standard pot

                        1 - 4” azalea pot

                        6 - 1.5” pots

wire                                       

bamboo stake

6 large wood beads             

sheet moss

plastic wrap                          

waterproof glue

quickcrete                            

raffia                                                               

EQUIPMENT:

drill with masonry bit

needle-nose pliers

INSTRUCTIONS:

  1. BODY TOP: Drill holes in a 4” standard pot for arms at a 120 degree angle or 1/3 of the circumference of the bottom of the pot, and about ½” from the bottom. (NOTE: if legs are desired also, drill 2nd pot also
  2. BODY BOTTOM:  Line a 4” standard pot with plastic wrap.  Mix quickcrete and fill half full.  Cut bamboo stake 10” long and place in concrete.  Place second 4” standard pot upside down on top of first to stabilize the stake until the concrete cures at least 24 hours. (NOTE: if legs are desired, drill holes and insert wire for legs before filling with plastic wrap and concrete.)
  3. ARMS (LEGS):   Insert 12” wire through holes in top pot.  Working on one side at a time, place the following onto wire: 1.5”pot, wood bead, 1.5”pot, wood bead, 1.5”pot and a final wood bead.  Cut wire even with the edge of the pot with needle-nose pliers and twist to secure.  Repeat on the other side. (NOTE: if legs are desired, assemble the legs in the same manner using pots ½” larger in diameter than arms.)
  4. BODY:   To assemble body, place a bead of waterproof glue around the top of the bottom pot, insert the top pot over the stake and line up with bottom pot.  Allow to dry.
  5. HEAD:   Insert a 4” azalea pot over the stake and secure with floral foam.  Add artificial grass and secure with wire u-pins. (NOTE: pot heads may be planted with live grass or chives and then inserted over stake)
  6. DECORATION:   Add wet sheet moss to cover wire to arms (legs), beads in the bottom of arms (legs) and between pots if desired.  Also add around the artificial grass to cover the floral foam.  Add raffia bow around neck.

clip_image002[5]

POT PETS


TURTLE

MATERIALS:           

Clay pots:      2 - 6” saucers

                        1 – 2” pot

                        4 - 1.5” pots

waterproof glue                   

moss

quickcrete                            

raffia

artificial grass                                                                                                 

INSTRUCTIONS:

  1. BODY :  Mix quickcrete and fill one 6” saucer half full.  Allow the concrete to cure at least 24 hours.  Place a bead of glue around the rim of the other 6” saucer and place on top of the other.  Allow to dry.
  2. LEGS:   Glue the four 1.5” pots to the sides of the assembled body to form the front and back legs.
  3. HEAD:  Using the 2” pot, place a bead of waterproof glue around the bottom of the pot and place at the edge of the assembled body pots.  Allow to dry.  Glue and insert a tuft of artificial grass into the pot.
  4. DECORATION:   Moss may be added inside legs and around the artificial grass in the head   Add raffia bow around neck.

FROG

MATERIALS:           

Clay pots:      1 - 4” standard pots

                        1 - 4” saucer

                        2 – 2” pots

                        4 - 1.5” pots

plastic wrap                          

waterproof glue

quickcrete                            

raffia

moss                                                   

INSTRUCTIONS:

  1. BODY :  Line a 4” standard pot with plastic wrap. Mix quickcrete and fill half full.  Allow the concrete to cure at least 24 hours.
  2. HEAD:  Using a 4” saucer, place a bead of waterproof glue around the top of the saucer and line up with body pot.  Allow to dry.  Glue two 1.5” pots on their sides on top of the saucer for eyes.
  3. LEGS:   Glue one 1.5” pot and one 2” pot to each side of body to form the front and back legs.
  4. DECORATION:   Moss may be added to top of legs. Add raffia bow around neck.

 logo_thumb[15]


All hard work brings a profit,

but mere talk leads only to poverty.”

Proverbs 14:23
No comments: